Tuesday, January 22, 2013

Shutter Speed

I'm a semi-procrastinator. I put off things until they bother me so much I just can't take it anymore, and then, I get whatever it is I've been procrastinating done in a very short, very exhausting amount of time.

We moved into our house in December of 2011. In the master bathroom, the sellers had put up in the windows these paper shades that were stuck with heavy duty double-sided tape to the top of the window frame. They weren't the worst things I've ever seen... but they were by no means pretty.


Upon settling in, we immediately went about decorating, arranging furniture, and getting things the way we liked them. Yet, because, no one ever saw our master bathroom but us, we let it slide until we figured out what we wanted to do with them. I've always wanted a black and white bathroom. Black and white tile, white wainscoting on the bottom half of the wall, black paint on the top half, and black and white accessories. However, our house was freshly painted a tan color by the sellers, we didn't want to spend time painting before moving in, and I'm not entirely sure how to do wainscoting on these walls due to the weird wall ledge beside the tub. So, we left the bathroom tan.

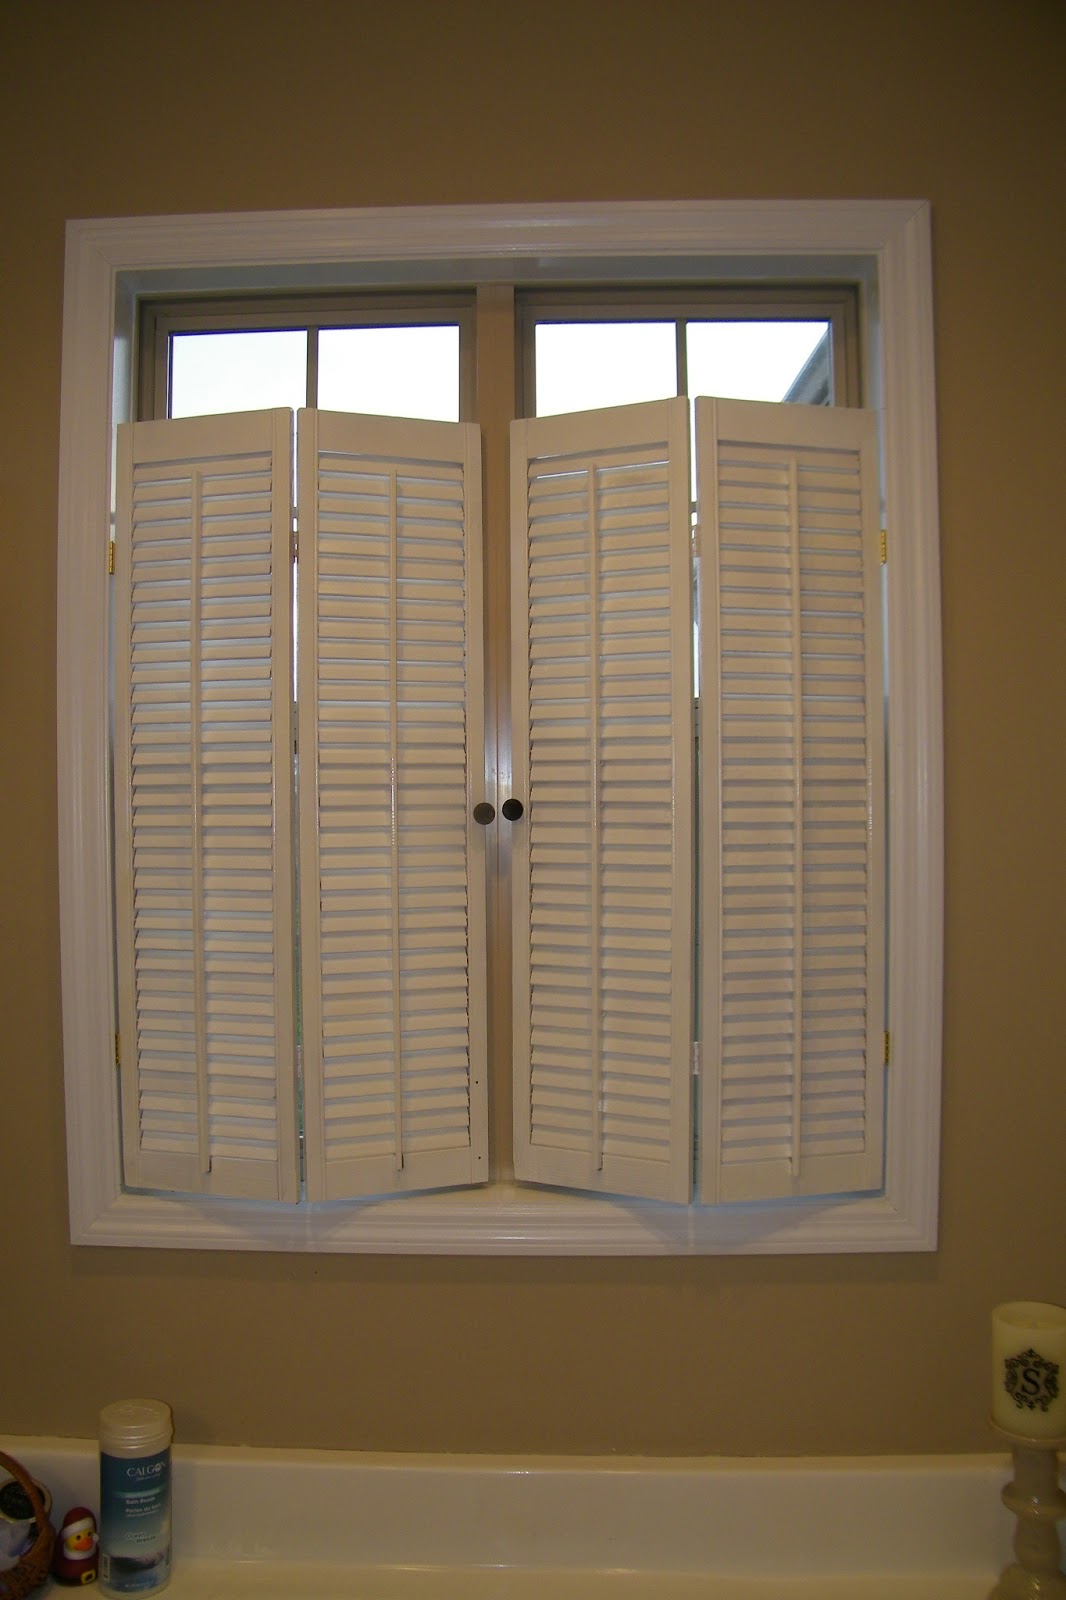
Not long after we moved in, I realized it will be years, if not never, before I have the chance for a bathroom exactly like I'd envisioned. So, rather than waste time and money on a decor that was my second choice, I decided to incorporate the tan into the black and white theme. So, our bathroom is black and white and tan. Once I'd decided that, I picked out window treatments. At first, I was going to make Roman shades with the fabric from my Bathroom stool project. Then, I realized that for decency sake, I'd have to keep the shades all the way down most of the time, and I really wanted more sunlight than that. That's when I went to the Houston Library in Athens, AL. There in the bathroom were old fashioned shutters. I fell in love. That was the moment I decided I had to have shutters for my own bathroom.

My husband and I took measurements and checked out prices at Lowes. Yeah, there was no way we could afford that route. We then turned to one of my favorite home decor solutions: Antique Stores. We visited Hartselle, AL, and scoured the shops for four shutters that fit our measurements. It was not easy, but we were successful. As the shutters had a natural finish, now all we had to do was paint them white and hang them. Then, the month turned to June. It was simply too hot to be outside painting. Trust me, I tried. I took my little brush and a can of paint and sat for hours while making very little ground painting each slat one by one. So, I set the project aside for cooler weather. Granted the ideal time would have been Fall, but I was just incredibly busy in the Fall with other projects, and didn't have the motivation. It wasn't until after Christmas, when I worked on my Candlestick project, that I became inspired.

In my off time, I had decided that spray primer and paint was my best bet, as long as I was careful not to paint the shutters closed. So, armed with my trusty trigger tool and a can of primer, I went to work.

It was not a short project. I first sprayed all the shutters with primer. This was very important. The paint refused to stick without it... I tried. Then, I let it dry. I sprayed on another coat of primer. I let it dry. I sprayed on a coat of paint. I let it dry. I sprayed on several more coats of paint and let them dry. As I began to work on the last shutter, I ran out of the cheap Lowes paint I'd been using. You see, I didn't want this to be a million dollar project, so I bought the cheap stuff. I thought paint is paint and white is white (in the spray paint world at least). I had on hand some Rustoleum paint I'd used to paint my patio furniture. So, rather than go back to the store and buy more paint, I used it. I was shocked. One coat and it was covered. A few sprays of touch-up and it was done. Lesson learned, I thought to myself. If it looks like colored water, and it acts like colored water, it probably is very near to colored water. Don't buy the cheap stuff. You'll spend more money on more cans of it than you would on quality spray paint.

Despite my mistakes in paint choices, the shutters were FINALLY finished. Now, to hang them. I knew I got married for a reason. We bought shutter hinge kits at Lowes so we'd have matching hardware, and I commandeered my husband to help me for a Saturday project.

We relished the pulling down of the paper shades:

And after the shades were down, we found a couple of helpers:
^Zeus and Apollo^


After much measuring and many escape attempts by the screws, we got our bathroom shutters up! I love them so much! I love how they provide privacy while letting in light through the slats and through the unfiltered window at the top.



Damask Stool, Black Candlesticks, and Shutters!


Aren't they wonderful?! Just to prove it, here's a Before and After:

BEFORE
AFTER

Friday, January 11, 2013

All I Want for Christmas are Some Ugly Candlesticks...

(Sing the title. It works!... Annnddd now it's stuck in my head...)

Happy New Year! It is now 2013, and a brand new year for brand new things... or for making old things new.

You'll never guess what I got for Christmas. Yes, that's right. My in-laws gave me some of the ugliest candlesticks I've ever seen. I can hear you now, "That's not very nice to say on the internet... or ever." But it's ok. Really. I asked for them.

You see, for awhile now, I've been wanting some chunky candlesticks to decorate our soon-to-be black and white-ish bathroom. I just haven't been willing to shell out the money for some lovely, designer label versions. I had been meaning, instead, to go to thrift stores and such to see if I could find some that I hated enough to paint, but loved enough to buy. I just hadn't found the time. So, when my in-laws asked what I wanted for Christmas, I remembered their own love for thrift shop finds and a light bulb clicked on over my head. I ASKED them for chunky candlesticks, with cool shapes, and made sure to tell them that I didn't care how they were painted because I intended to paint over them. Boy, did they come through. (And threw in chunky candles to go with the candlesticks, which made it even better.)

See how ugly they are? No offense intended to any of you who might have some exactly like these.

Here they are individually:


That last one isn't so bad, but the other two are. In any case, it doesn't matter how ugly they are or aren't: they all have great shapes. So, I spent part of my time off after Christmas turning these from drab to fab. I used Rustoleum Gloss Black spray paint with the little trigger, which makes things so much easier, but is a little more expensive.


Believe it or not, this all took longer than I thought it would. Somehow, whatever the candlesticks are made of did not like spray paint very well. I had a large problem with the paint just running off, and it wasn't mostly on the one I thought it would be (the tall stone candlestick). However, I just kept at it. I sprayed several coats, until finally it was all covered and dry.

Meanwhile, I worked on some other darlings I found at an antique shop shortly after Christmas.


I really like the gold ones. I love all the detail in their pattern. I decided that I wanted all of these to be silver, however. So... using Krylon Silver Foil Metallic spray paint, I made it so.


This can of paint did not have the handy-dandy easy-on-your-poor-fingers trigger. But I'm going to tell you a secret. Or, if you already know, then I'm going to tell you something utterly mundane that I should have discovered a long time ago. It's this:


This is a tool made by Rustoleum that fits over the normal nozzled cans of paint and makes them into a trigger can. Honestly, over the last few days, this baby has saved my life. I wouldn't have fingers left if it weren't for this guy. Amazing product! I wish someone had told me it existed. Now, I don't have to spend the extra amount for the cans with the trigger built in. This gadget was around $7 at Lowes. Go get one, or two, like I did.

Ok, back to our regularly scheduled programing:
I sprayed the antique shop candlesticks silver. They took considerably less time than the Christmas ones did. I love how they turned out.

Look at the detail... and how these can hold both chunky and tapered candles!

Now, back to the ugly Christmas candlesticks.
When they FINALLY dried, I placed them in their natural habitat, holding their own white candles.


Not so ugly now, are they? They make me smile. The mixture of shapes is what really does it for me. I'm so excited! And really thankful for in-laws that know me so well. Not only did they give me the gift of beautifully ugly candlesticks, but they gave me the gift of a project I can be proud of.


Inspired, yet?
I was. After finishing this project, and wanting desperately to use my trigger tool more. I resolved to tackle our bathroom window-dressing issue. You see in those last two pictures the temporary paper sticky blinds in our bathroom? Yes, I know they are ugly. And yes, they have been up for over a year now. I know. I'm terrible. But just wait... I'm working on it. For real, this time.

Happy Painting!

Tuesday, December 18, 2012

Seven Days....

NO, I've never seen that movie, but I think it's fun to quote that line.

It's Seven Days til Christmas folks! Yes, I just said, "folks." Which when pronounced, does not have an 'L.' If it does, ya ain't from round here. "Here" is north Alabama. Where it's a sunny 59 degrees, and little chance of a White Christmas in sight. However, we can dream, can't we.

In all actuality, the one White Christmas we've had in nearly a century (2010), though amazing and a dream come true, was not much fun. You see, there are no snow plows in Alabama. We have no need for them. Therefore, when it does snow, we shut down. Entirely. And wait for the next day, when it will have inevitably melted. Nonetheless, shutting down on Christmas Day really wasn't all that much fun. Several gatherings were cancelled and couldn't be rescheduled. So, in all honesty, once was enough for me. I'd rather be able to actually go celebrate Christmas with family, than have a White Christmas while I'm stuck inside. Don't get me wrong, 2010 was our first Christmas as a married couple and was simply magical to have that special, get-up-and-it's-snowing, hey-it's-also-Christmas feeling together. But, it's not something I need every year.

What I do need every year, is Christmas music! And lots of it. So, while my cat tries to open the Christmas presents... or vanquish the terrifying train around the tree, I shall share with you some of my favorite Christmas songs. Maybe they'll help you get in the Christmas mood. You only have Seven Days...


First, an obscure song that's played at my parents' every year while we decorate the tree. Such a silly song, but SO much fun!

Yah Dis Ist Ein Christmas Tree- Mel Blanc


Because Karen Carpenter is Awesome, you get two from her:

Home for the Holidays- The Carpenters


Really, the entire Carpenters Christmas Portrait album is fantastic. It was hard to choose just two, and I can't really call these my favorites because almost all of them are favorites from this album.

Merry Christmas Darling- The Carpenters


For a little (law-abiding) joyriding...

Little St. Nick- Beach Boys


Because we all love Brenda Lee, whether we know it or not, and we all wish for a little snow.

Marshmallow World- Brenda Lee


And another... (See, I told you. You love her. You just didn't know it.)

Rockin Around the Christmas Tree- Brenda Lee


For a little romance... and duet:

Baby, It's Cold Outside- Johnny Mercer and Margaret Whiting


I love duets. And I love Bing Crosby:

Silver Bells- Bing Crosby and Carol Richards


For heartbreak... with a little bounce.

Last Christmas- Cascada


Straight out of the Rudolph movie. Brings back memories.

Holly Jolly Christmas- Burl Ives


My husband insists I sing the back-up on this song. He will sing his part over and over and over, until I chime in. He's really very pushy about it. It's tradition.

Snowflake- Jim Reeves


A little Judy Garland, anyone?

Have Yourself a Merry Little Chrismas- Judy Garland


Really, what music list can exclude Elvis? It just can't. Here's the King, without Martina McBride sticking her two cents in.

Blue Christmas- Elvis Presley


Here's a little energy boost to send you on your cheery way! (Be sure to try to hit that high note! Good luck!)

All I Want for Christmas is You- Mariah Carey


Clearly, these are not ALL of my favorite Christmas songs. How could they be? There are so many to choose from! However, if I counted correctly (and it's very possible I didn't), here's 14 of my favorite Christmas songs. So, you have 7 days to get in the Christmas mood. Take two and call me in the morning.

Merry Christmas!

Tuesday, December 4, 2012

My Christmas Card to You

I managed to wait until November 30th before sending out my Christmas cards this year. It's our first "official" year in our new home. We have a new Christmas tree. The house is decorated with lights (if we can ever get them to stay on). It's just never felt more exciting for it to be nearly Christmas. I just couldn't wait to spread my Christmas cheer! So, to those of you who received a card from me on December 1st, that's why. To those of you who didn't... well, send me your address, and I'd love to send you one next year!

Sending out Christmas cards, hopefully, means we'll be receiving cards of our own. So, in preparation, I decided to come up with a good way to display them. I just love looking at all the ones we get. I found these ideas via Pinterest, and decided I'd try my own version.

I used the same ribbon I used for my snowflake wreath and two more pre-made Christmas bows. I just needed a step-ladder, my glue gun, and my trusty staple gun.


 I measured the length of ribbon I wanted hanging down the center of each of my French doors in our dining room. Then, before cutting, I stood on a step-ladder and stapled the ribbon to the very top of the door (NOT the front). With it hanging the way I wanted, I just decided where I wanted the ribbon to end and cut the ribbon there. Then, I took my pre-made bow and hot glued it to the top of my ribbon, near the top, but not in the way of the door opening and closing.


 I then did the same thing on the other door. However, one of my doors has wood at the top, but the one without the knob is metal all the way. That meant the staple gun wouldn't work on that door. So, since the door is usually stationary, and I didn't need to worry about a hold that would withstand movement, I just used some clear packing tape to tape the ribbon to the very top of the door.

And just before I got started, the girl who lives next door hand-delivered our first Christmas card, so we had one ready to display! I used a scrapbooking glue dot roller on the back of the card to attach the card to the ribbon. Here's the finished product!


 So, this is how we plan to display our Christmas cards this year! Do you have any other ideas?


(P.S. Through the glass you can see our teal Adirondack chairs. We'll talk about them later...)

Happy Holidays!


Saturday, December 1, 2012

I Have a Confession...

I have a wreath obsession. I think it stems from my maternal grandmother whose door has never been without a wreath and who uses them in the most unusual places... like the bathroom. Nevertheless, I feel like my front door is missing something if it ever happens to be without a wreath. It's a curse, really. Occasionally, I'd like to look out the door without having to look through a wreath. Yet, the wreath compulsion always wins. I love more than just having a wreath and looking at a wreath. I love making wreaths. With the holidays, I've recently made two (and a half) wreaths that I thought I'd share.

Because I like chronology, I'll share the Fall wreaths first, though I know the last wreath is more current. I love Fall, so I made my Fall wreath really early in the season. It was really more like late summer. So, I didn't want much of a Autumn-y feel quite yet. The inspiration came from Lindsay at what is now Makely School for Girls with her tutorial for this wreath.

However, I didn't really follow her instructions much. I decided I didn't really need my wreath quite that full, so I bought just one plain grapevine wreath at a local outlet store, Old Time Pottery. I also bought some late summery silk flowers to match some ribbon I found at Hobby Lobby and used a wooden initial that I also found at Hobby Lobby.


I simply laid the "S" on top of the wreath, while I cut apart the flower bushes and began poking flower stems into the grapevine here and there where I wanted my flowers. Nothing is glued onto the wreath so that I could reuse it later. Once I was satisfied with the look (and it had stopped hailing), I looped the ribbon through both the "S" and the wreath and secured the ribbon to the TOP of the door (as in the part touching the door frame, not the top of the front of the door) with my staple gun.

I loved the idea of not gluing anything to the wreath so that I could reuse it later, so my original plan was to use purple flowers for late summer and to replace the purple with Fall leaves and such. However, I just loved the purple so much that I couldn't bear to take it down. So, I just added a few Fall leaves and three floral pumpkins I found at Hobby Lobby. The pumpkins were great because that had a stem attached to the bottom of them so that they could be stuck into arrangements with ease. So again, there was no gluing, just a lot of poking stems into the grapevine.


I honestly love it both ways. I love the early version with the grapevine showing in places, but I also love the fuller version. Mostly, I love that it changed with the ripening of the season and was easy to make fresh without changing entirely.

Sadly, the time for Fall wreaths has come to a close. But that means Christmas/Holiday/Winter wreaths! I'm so excited to make another wreath! I considered continuing with the grapevine base, but this wreath I saw via Pinterest caught my eye. I have always LOVED snowflakes in Christmas decoration and thought how simple this would be. I found a box of large snowflake ornaments at Hobby Lobby (for half price!). You could use any size or color of snowflakes, really, as long as you have enough. I just laid out the snowflakes overlapping in a circle and began hot gluing them to one another. I glued each snowflake in several places for added support. I did have my doubts about needing something to glue the snowflakes onto for support, but they were unfounded. The snowflakes seem to be doing just fined simply attached to each other. I then layered more snowflakes on top of my original circle and continued hot gluing until I was satisfied with the look.

This was during the brainstorming phase, with my helpful kitten putting in her two cents.
 
 I then took some red ribbon that I had left over from last Christmas, looped it through the wreath, and stapled it to the top of the door. Once it was up, it looked a little too simple. So, I had a pre-made red bow from the Dollar tree in with my Christmas decorations. I just hot glued the bow to the ribbon used to hang the wreath (not to the wreath itself). The tails of the bow were a little long for my liking, so I just trimmed them a little. I love the way it turned out!

This was so much fun to make, and SO simple! I love that it isn't too Christmas-y to leave up for a while into the New Year... or until the itch to make another wreath strikes again! Stay tuned...


Thursday, November 29, 2012

"Sweet & Spicy Chunky 'Spaghetti'"

John and I had not been married long. I worked my own day job, while my husband worked night shift, three nights a week at the Mental Health Facility of a hospital. I was tired, he was tired, we were out of groceries, and we were starving. In our cupboards were just the staples--things my mother taught me to never run out of, no matter what. Among them, that could yield quick suppertime results, were frozen burgers, but no buns; tomato soup, but we were hungrier than that; a can of Rotel, but no Velveeta; linguine noodles, but no makings for Alfredo sauce; and the emergency can of tomato paste that Momma insisted I would need someday, though I'd had no use for it yet. 

Growing up in the country, grocery stores were not just around the corner. When I was taught to cook, I was taught improvisation in the extreme. What do you do when you need buttermilk for the pie you have halfway mixed and just realized you don't have it? You mix regular milk with vinegar. What do you do when the chicken casserole calls for more chicken than you have? Mix in a can of cream of chicken soup. These are just a few examples, and I'm sure every family has their own versions. The point is that my mind has been trained to look at ingredients and compute the edible items I can make out of them. Call it a gift. Call it military training borne out of perceived starvation.

So, on that dreary day when my husband needed supper and neither of us had energy to grocery shop, "Sweet & Spicy Chunky 'Spaghetti'" was born.


Sweet & Spicy Chunky 'Spaghetti'

1 can of tomato soup
1 can of Rotel
1 (6 oz) can of tomato paste
4 frozen burger patties OR 1 lb of ground beef (for less chunky)
1 pkg of uncooked linguine noodles
1 tbsp dried oregano (optional)
1 tbsp dried basil (optional)

Begin boiling linguine in a pot of water with olive oil and salt until al dente. Brown burger patties (or ground beef) in a large skillet. Once browned, drain off grease and return to pan. If using patties, cut them into bite-sized chunks. Add tomato soup, Rotel, and tomato paste. Add 1 tbsp oregano and 1 tbsp basil. Cook on low, stirring occasionally, until warm.  Drain linguine (and if desired, toss with 2 tbsp olive oil, 1 tsp of salt, 1 tbsp of lemon juice, 1 tsp of oregano, and 1 tsp of basil.) Toss sauce with linguine and serve.


What I love about this recipe is not only the sweet flavor of the soup with the spicy flavor of the Rotel and the flatness of the linguine (I have issues with actual spaghetti noodles, blame my mother), but also the fact that each of these ingredients could be part of many other recipes. I've learned to keep these ingredients on hand at all times, so I know I always have at least one thing I can make. In fact, it's when I run out of one of these that I know it's time to grocery shop again... something I have gotten better at, you'll be pleased to hear. I think this is the perfect recipe for every young married couple, college kid, and bachelor with a stinky bachelor pad. So, "Stick with me, and you'll never go hungry again!" (Please, somebody, get the reference!)

Wednesday, November 28, 2012

Movie Review: Rise of the Guardians

Image via Google search
There aren't many movies I care to see, much less care to review, but Rise of the Guardians was worth every cent. This movie takes all your dreams and imaginary heroes, gives them validation, and then brings them to life in a delightfully fresh way.

The Rise of the Guardians is quite a hit, but I barely noticed this movie had premiered due to surprising and severe under-advertising for a movie with such a star-studded cast. Chris Pine voices the lead character, Jack Frost, and though I've been a fan of Pine's since The Princess Diaries 2, I believe the directors couldn't have chosen better. Pine's blend of vulnerable tough guy with a dose of sardonic humor is just the right touch for Jack Frost, an "imaginary" hero who can't remember where he came from and can't be seen (except by other "imaginaries"). Jack Frost struggles with finding his inner hero, all while doing what's right, though he doesn't know exactly why it is.

As Chris Pine's Frost banters with Hugh Jackman's Easter Bunny, the movie's audience gets a rare treat. Hearing action figure Jackman's quips in his rarely heard native Australian accent battling Pine's sarcastic volleys will bring more than a few rumbles of laughter (if only for the funny accent). And just like the real-life Jackman, Easter Bunny can pack a wallop. He is certainly not a Bunny-Foo-Foo to be messing with, most of the time. Yet, inside that boomerang weilding cottontail is a sweet chocolate bunny who just wants Easter to go off without a hitch, so children will continue to believe in him, have hope, and save him from...melting (?).

Helping Easter Bunny save, um, Easter, is ironically, Santa Claus, voiced by Alec Baldwin with a Russian (I think) accent. Tattooed guns of Naughty and Nice introduce this brawny character who seems to be the leader of the Guardians, if anyone but the Man in the Moon can be called such. Santa first sees the impending doom from Jude Law's Boogeyman threatening to steal all the joy from children everywhere, and thus the identities of the Guardians. Baldwin as Santa is brilliant, so much so that I had no idea the voice belonged to Alec Baldwin, of all people. Yes, Santa is jolly, but that big ole' belly doesn't just house a bowl full of jelly. His center is full of wonder and more than a little intuition.

As Law's Boogeyman threatens more and more of all that we hold dear, he really does own the market on fear. This disillusioned, embittered character can become quite dark at times (think Loki from The Avengers), possibly inducing in younger viewers the Night-Mares he's so fond of. However, if your child can stick it out until the end, we're all taught how to deal with such fears. Like Loki, the Boogeyman has deep-seated emotional issues rooted in his envy of all the adoration and trust bestowed on the Guardians by children throughout time. He's less of a bad guy, than a misunderstood child who's considerable talents are misdirected...and can throw a mighty temper tantrum. He spends his time, along with his amazingly animated Night-Mares, trying to see that the Guardians become exactly what he is: alone and invisible.

The final two Guardians are Mr. Sandman, Boogeyman's most direct enemy in the dream business, who has no voice, which is surprisingly comedic, though he's no pushover, and the Toothfairy, voiced by Isla Fisher, who rounds out the group with some feminine compassion and is a treat for all the little fairy fans out there. Though these two make less of an immediate impression, they bring a completeness to the group that would be lacking otherwise. By the end of the movie, there is no doubt that Mr. Sandman is not just a snooze-fest, and the Toothfairy embodies everything a fairy should be.

This movie is a fabulous family film, which spans all the holidays, despite a wintry setting. Not a curse word or bad attitude to be had (other than the bad attitude we're all rooting against, of course), though there is some violence.  The message is that there's a little bit of a hero in all of us and that we can only be harmed by what we allow to harm us. It even teaches compassion and understanding for the "bad guy." However, it's not just a family film. The mood lends itself to the adults in the audience who want to experience the innocence of being a kid again, or just want to watch something that will have them hanging on the edge of their seats...okay, maybe just sitting up a little straighter. After all, it is about heroes that are simply imaginary. Or are they? It all depends on whether or not you believe.


To check the appropriateness of this movie for children, a good break-down of the content is found here.