Tuesday, January 22, 2013

Shutter Speed

I'm a semi-procrastinator. I put off things until they bother me so much I just can't take it anymore, and then, I get whatever it is I've been procrastinating done in a very short, very exhausting amount of time.

We moved into our house in December of 2011. In the master bathroom, the sellers had put up in the windows these paper shades that were stuck with heavy duty double-sided tape to the top of the window frame. They weren't the worst things I've ever seen... but they were by no means pretty.


Upon settling in, we immediately went about decorating, arranging furniture, and getting things the way we liked them. Yet, because, no one ever saw our master bathroom but us, we let it slide until we figured out what we wanted to do with them. I've always wanted a black and white bathroom. Black and white tile, white wainscoting on the bottom half of the wall, black paint on the top half, and black and white accessories. However, our house was freshly painted a tan color by the sellers, we didn't want to spend time painting before moving in, and I'm not entirely sure how to do wainscoting on these walls due to the weird wall ledge beside the tub. So, we left the bathroom tan.

Not long after we moved in, I realized it will be years, if not never, before I have the chance for a bathroom exactly like I'd envisioned. So, rather than waste time and money on a decor that was my second choice, I decided to incorporate the tan into the black and white theme. So, our bathroom is black and white and tan. Once I'd decided that, I picked out window treatments. At first, I was going to make Roman shades with the fabric from my Bathroom stool project. Then, I realized that for decency sake, I'd have to keep the shades all the way down most of the time, and I really wanted more sunlight than that. That's when I went to the Houston Library in Athens, AL. There in the bathroom were old fashioned shutters. I fell in love. That was the moment I decided I had to have shutters for my own bathroom.

My husband and I took measurements and checked out prices at Lowes. Yeah, there was no way we could afford that route. We then turned to one of my favorite home decor solutions: Antique Stores. We visited Hartselle, AL, and scoured the shops for four shutters that fit our measurements. It was not easy, but we were successful. As the shutters had a natural finish, now all we had to do was paint them white and hang them. Then, the month turned to June. It was simply too hot to be outside painting. Trust me, I tried. I took my little brush and a can of paint and sat for hours while making very little ground painting each slat one by one. So, I set the project aside for cooler weather. Granted the ideal time would have been Fall, but I was just incredibly busy in the Fall with other projects, and didn't have the motivation. It wasn't until after Christmas, when I worked on my Candlestick project, that I became inspired.

In my off time, I had decided that spray primer and paint was my best bet, as long as I was careful not to paint the shutters closed. So, armed with my trusty trigger tool and a can of primer, I went to work.

It was not a short project. I first sprayed all the shutters with primer. This was very important. The paint refused to stick without it... I tried. Then, I let it dry. I sprayed on another coat of primer. I let it dry. I sprayed on a coat of paint. I let it dry. I sprayed on several more coats of paint and let them dry. As I began to work on the last shutter, I ran out of the cheap Lowes paint I'd been using. You see, I didn't want this to be a million dollar project, so I bought the cheap stuff. I thought paint is paint and white is white (in the spray paint world at least). I had on hand some Rustoleum paint I'd used to paint my patio furniture. So, rather than go back to the store and buy more paint, I used it. I was shocked. One coat and it was covered. A few sprays of touch-up and it was done. Lesson learned, I thought to myself. If it looks like colored water, and it acts like colored water, it probably is very near to colored water. Don't buy the cheap stuff. You'll spend more money on more cans of it than you would on quality spray paint.

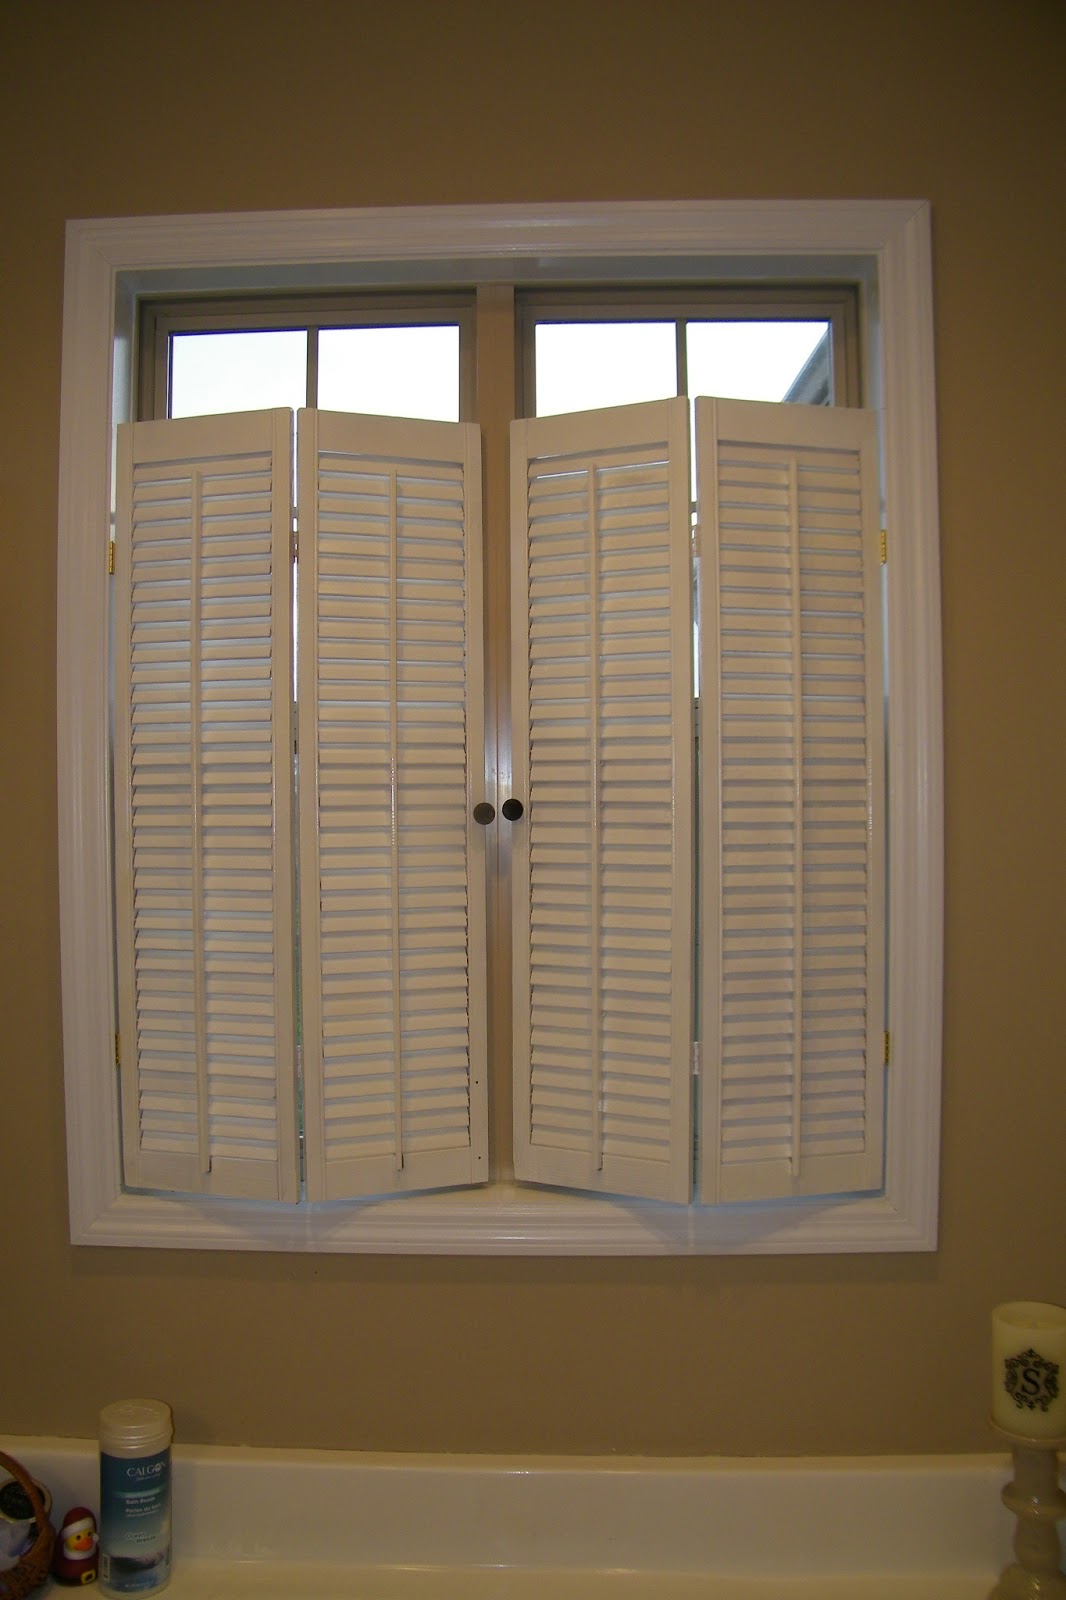
Despite my mistakes in paint choices, the shutters were FINALLY finished. Now, to hang them. I knew I got married for a reason. We bought shutter hinge kits at Lowes so we'd have matching hardware, and I commandeered my husband to help me for a Saturday project.

We relished the pulling down of the paper shades:

And after the shades were down, we found a couple of helpers:
^Zeus and Apollo^


After much measuring and many escape attempts by the screws, we got our bathroom shutters up! I love them so much! I love how they provide privacy while letting in light through the slats and through the unfiltered window at the top.


Damask Stool, Black Candlesticks, and Shutters!


Aren't they wonderful?! Just to prove it, here's a Before and After:

BEFORE
AFTER

Friday, January 11, 2013

All I Want for Christmas are Some Ugly Candlesticks...

(Sing the title. It works!... Annnddd now it's stuck in my head...)

Happy New Year! It is now 2013, and a brand new year for brand new things... or for making old things new.

You'll never guess what I got for Christmas. Yes, that's right. My in-laws gave me some of the ugliest candlesticks I've ever seen. I can hear you now, "That's not very nice to say on the internet... or ever." But it's ok. Really. I asked for them.

You see, for awhile now, I've been wanting some chunky candlesticks to decorate our soon-to-be black and white-ish bathroom. I just haven't been willing to shell out the money for some lovely, designer label versions. I had been meaning, instead, to go to thrift stores and such to see if I could find some that I hated enough to paint, but loved enough to buy. I just hadn't found the time. So, when my in-laws asked what I wanted for Christmas, I remembered their own love for thrift shop finds and a light bulb clicked on over my head. I ASKED them for chunky candlesticks, with cool shapes, and made sure to tell them that I didn't care how they were painted because I intended to paint over them. Boy, did they come through. (And threw in chunky candles to go with the candlesticks, which made it even better.)

See how ugly they are? No offense intended to any of you who might have some exactly like these.

Here they are individually:


That last one isn't so bad, but the other two are. In any case, it doesn't matter how ugly they are or aren't: they all have great shapes. So, I spent part of my time off after Christmas turning these from drab to fab. I used Rustoleum Gloss Black spray paint with the little trigger, which makes things so much easier, but is a little more expensive.


Believe it or not, this all took longer than I thought it would. Somehow, whatever the candlesticks are made of did not like spray paint very well. I had a large problem with the paint just running off, and it wasn't mostly on the one I thought it would be (the tall stone candlestick). However, I just kept at it. I sprayed several coats, until finally it was all covered and dry.

Meanwhile, I worked on some other darlings I found at an antique shop shortly after Christmas.


I really like the gold ones. I love all the detail in their pattern. I decided that I wanted all of these to be silver, however. So... using Krylon Silver Foil Metallic spray paint, I made it so.


This can of paint did not have the handy-dandy easy-on-your-poor-fingers trigger. But I'm going to tell you a secret. Or, if you already know, then I'm going to tell you something utterly mundane that I should have discovered a long time ago. It's this:


This is a tool made by Rustoleum that fits over the normal nozzled cans of paint and makes them into a trigger can. Honestly, over the last few days, this baby has saved my life. I wouldn't have fingers left if it weren't for this guy. Amazing product! I wish someone had told me it existed. Now, I don't have to spend the extra amount for the cans with the trigger built in. This gadget was around $7 at Lowes. Go get one, or two, like I did.

Ok, back to our regularly scheduled programing:
I sprayed the antique shop candlesticks silver. They took considerably less time than the Christmas ones did. I love how they turned out.

Look at the detail... and how these can hold both chunky and tapered candles!

Now, back to the ugly Christmas candlesticks.
When they FINALLY dried, I placed them in their natural habitat, holding their own white candles.


Not so ugly now, are they? They make me smile. The mixture of shapes is what really does it for me. I'm so excited! And really thankful for in-laws that know me so well. Not only did they give me the gift of beautifully ugly candlesticks, but they gave me the gift of a project I can be proud of.


Inspired, yet?
I was. After finishing this project, and wanting desperately to use my trigger tool more. I resolved to tackle our bathroom window-dressing issue. You see in those last two pictures the temporary paper sticky blinds in our bathroom? Yes, I know they are ugly. And yes, they have been up for over a year now. I know. I'm terrible. But just wait... I'm working on it. For real, this time.

Happy Painting!