We had reached an equilibrium, he and I. It wasn't perfect, but the Boy and I had a schedule. Breakfast with cartoons, playtime, nap time (for him, too!), cooking Daddy's supper together, family time, and bed time. I knew when Baby Brother comes, this would all change and throw us into a period of chaos. I have prepared myself for that eventuality. What I didn't realize was how soon the chaos would come upon us. I thought we'd have our normal, a crazy hospital stay, and THEN the chaos. How could there be chaos when there's no tiny, Hulk baby to make the world turn upside down yet? Ah, but the force is strong with this one. (Yes, I mixed universes, get over it.) Tiny, Hulk-baby-in-utero wanted to make sure no one forgot he's coming soon, and so, Mommy got put on bed rest. Now, suddenly, in the span of an afternoon, nothing's the same... But all seemed the same... Except that Mommy has to nap a lot (this is my devastated face). It's the same schedule, but with grandmas here to help. What could be more fun?
But after the 50th, "Mommy, where are you?" and the 100th screaming fit when I left the room (I had to potty...again), and the 500th defiance to "obey," it's become quite clear that something's not the same. The Boy can sense a disturbance within the force (I'm really not a Star Wars fan, I promise). And as I asked myself what am I doing wrong, I was made to realize, "something has changed within me, something is not the same. I'm playing by the rules of someone else's game." (Ok, I'll stop.)
But seriously, all theatrical references aside, Mommy's no longer in control... And while that's not a bad thing, perhaps it's good for both of us to have that experience right now, it still means chaos. Because in Boy-world, if Mommy's not in control, who is? And in Mommy-world, if I can't get our act together now, how on earth will I know which way is up when there's two of them (there's gonna be TWO of them!)?
Today, I failed at controlling the chaos. And then I realized that's what it is: chaos. Sooner than I expected, prepared for, but here nonetheless. I've been mourning the loss of normal, or the arrival of chaos, or chaotically mourning, or just having a chaotic morning. Who knows?! Time to embrace it.
And THEN, I'll get to embrace that squishy, 'little' Hulk-baby, and teach him how to upset Daddy with misguided geekdom references. I had the order backwards, but that's chaos for you.
Tuesday, February 23, 2016
Wednesday, February 10, 2016
Boys
It was 2:41am. I heard a door shut. The pitter patter of little feet. Our bedroom door open and close. Then, a little voice, “Mommy? I si’ wi’ you?”
“I’m here, baby. You can sit with me,” not knowing or caring what time it was, the object simply being to just give him whatever he wants so we can all rest, principles left in the eye-grit of sleep.
“Daddy? Whatcha doomin?” as if most parents do any number of things in the dark in the middle of the night… I don't know, perhaps it was a valid question, but “Shh, baby, Daddy's sleeping. If you're going to stay in here, you have to be quiet and be still.” A whispered, “K,” answered from the dark.
We settled back down, somehow with Boy legs against my very large belly. Just as breathing becomes even and a mother’s hope rises, I feel the flops. “Mommy, was dat?” *Sigh* It had been one of those rare-at-this-point, hard sleeps. “That's the baby. He’s trying to sleep, too,” I hope, though I doubt his brother-in-utero really had much plans to that effect after having been awakened so early...or late, depending on which side of the clock you're on. “Shh...go to sleep.” Big brother settled back down; little brother did whatever he wanted.
And it was in that instant that my now-awake consciousness (it had been such a GOOD sleep) realized the beauty of motherhood encapsulated by that moment. The preciousness of snuggling my two boys in a way I soon will never again. The little boy wiggles, inside and out. The desperate clinging to some principle in the face of midnight requests for Mommy. The exhaustion...oh, the exhaustion (it had been SUCH a GOOD sleep). All rolled together into one shadow-hazed yawn of a soft mattress and warm blankets on a cold, winter night.
He tried. He really did. But an hour later, after a request of Mickey and, “I hungwy,” Mommy gave up. Between the three of us taking turns wiggling (I couldn't help it!), and waking the other two light sleepers up again, it just wasn't happening. Daddy sleeps hard, but his slumber can only take so much when faced with the wiggling elephant and her two offspring on the other side of the bed. So, based on the principle that he and I can't do this together much longer (that counts, right?), Mommy and the Boy snuck off for a little midnight (early morning?) snack and Mickey binging. Granmommy’s coming to play tomorrow (today). I’ll catch up on bedrest, then. If she’s lucky, maybe the Boy will, too.
Sunday, June 2, 2013
I've Looked at Clouds from Both Sides Now...
We have made much progress on Baby's room! We've gotten a lot done in the last few weeks. It's been so exciting to watch things come together just like (or better than) I imagined!
I think I mentioned before that we had bought the crib and the changing table/dresser. The dresser needed painting so that it would no longer look like a purply-gray Dalmation. We did indeed paint the dresser, a chest of drawers, a corner cabinet, and a wall shelf Sherwin Williams' "Dover White." All of the pieces look revived, refreshed, and relieved from years in a sad coat of paint.
While we had the furniture in the garage for painting, we also painted Baby's bedroom walls. When my husband and I were dating, and I would visit his family, I was always placed in what used to be my brother-in-law's bedroom. His room was on the second floor, as far as you could get away from everyone else (the privacy was appreciated in a house full of boys), and the walls were bright blue with clouds everywhere. My brother-in-law had planes and dragons everywhere, and I could see how cool it could be as a boy's room. BUT as a girl, staying in that room, surrounded by clouds, I always felt like a princess living in the highest room in the tallest tower. I could easily have made that room into a fairy castle in the sky. So, all throughout dating my husband, I always thought that if we ever had children, we'd paint the room just like that. And since my mother-in-law (former Art Studies major) had painted the room by herself the first time, we should have no problem recreating the paint job.
Fast forward seven years, and my husband and I were ready to paint the room blue with clouds. Except this time, I didn't want bright, little boy blue; I wanted soft, soothing, baby blue since we aren't finding out the gender of this baby. Sherwin Williams was helpful enough to carry "Aviary Blue," which was the perfect shade.
The technique to make the clouds was rather unusual. Usually when you think blue with clouds, you think, paint everything blue and then paint white clouds on top. My mother-in-law had a better way. We painted the entire room bright white first and let it dry. Then, I went around the room and marked where I wanted the clouds to be. She would roll on some blue around the cloud area, and then wipe off the blue with a wet rag to make the clouds. It sounds confusing, I know. I couldn't visualize how it would be done beforehand. I just trusted my mother-in-law. She'd done it once. I assumed she could do it again.
You are in luck. I had took a video (of marginal quality) of my mother-in-law "finding" a cloud. You can see for yourself how we did it:
Isn't that amazing? It turned out perfectly! I'm so in love with the room! Here are some pictures of it in progress.
Brown-to-White Day
 |
| Brother-in-law helping |

 |
| Mother-in-law painting |
 |
| Husband on a ladder |
Cloud Day!
 |
| I marked where I wanted clouds with blue tape. |
 |
| Pregnant me wiping clouds with MIL |

 |
| MIL painting |


 And so we had our blue cloud baby room.
Since we aren't finding out the gender, I've decided to go with yellow accents for the room. I found some lovely yellow damask canvas fabric that my amazing mother-in-law helped make into a slipcover for the rocking chair I already had. I recovered the ottoman in the same fabric that I found at Hobby Lobby. At Lowe's, we found the same color yellow in a Valspar spray paint, which my wonderful husband used to paint a lamp we already had yellow. Also at Hobby Lobby, I found some yellow fabric that was already gathered with stretchy thread. I used that fabric and this lady's idea to make a crib skirt. We moved back in the furniture, cleaned out the closet, and soon will work on window treatments to filter the light for naptimes. Mostly, we're just waiting on Baby. We're are so incredibly happy!
Here's the (mostly) finished room!


Thursday, April 25, 2013
Where Dreams About Potty Breaks Probably Means You Need to Wake Up and Go...
Most of you have heard by now, but for those of you who haven't, my husband and I are expecting a baby in October, if the Lord wills. This, of course, accounts for my long absence from my writing. Between work and pregnancy issues, I haven't felt like doing anything, much less writing about it. However, work is slowing down, and the pregnancy issues have regulated somewhat (for the moment), so this Momma is about to have lots of projects to tell you about!
I can't wait to get started on all the things I want to do before Baby comes! For those who care, and so I'll have it written down somewhere, here's the list of large projects I hope to complete:
And that's just the short list... so far...
Of course, ideally, we'll get most of this done in the next couple of months so that by the time October rolls around and I'm hideously uncomfortable, I won't still be worried about all of this. We'll see.
Fortunately, thanks to some wonderful parents and in-laws of mine, we have two of the items already marked off the list. A few weeks ago, while I was slaving diligently into the night (ok, so it felt like night), my parents called me. They had discovered a crib that they thought I might like. I must assure you that I do like it! It is a crib, but converts to a toddler bed and then to a twin bed. It's just what I wanted.
My lovely parents brought it home for us, and helped us get it out of the box.
The next day, while I was gone, my sweet husband set up the crib to surprise me.
Isn't it precious!?
Meanwhile, I had decided that instead of a traditional changing table, I wanted to convert a dresser into a changing table. This would allow the furniture in Baby's room to grow with Baby.
After telling this to my in-laws, they jumped right on it. Searching in antique shops, thrift stores, and Craigslist, they sent me picture after picture of dressers they thought I might like. While I didn't end up choosing one that they found (though I almost did), their ideas helped me decide what I was looking for in a dresser. I decided that I was going for a look something like this:
Obviously, what I'm looking for is not exactly like this. For one thing, who puts shelves down so far on the wall where the baby could reach them while being changed? I'm not really sure about some people's style choices these days. Nonetheless, as far as the dresser/changing table situation goes, I really liked this style. I like that there's a pad for the changing, but enough room to the side to possibly put a basket of diapers, wipes, etc. I also like that there are drawers for storage, but also cabinets for some things that might not fit in drawers. The dresser is also generic and versatile enough to become just a dresser once Baby is grown and a changing table is no longer needed.
But you don't need to hear me go on and on forever about why I like it. All you need to know is that this is similar to what I was looking for. So, this past weekend, my husband and I made a forage into the depths of a flea market in search. Amazingly, we found it. It, also, is perfect.
It's a strange gray color, and unfortunately, has been distressed to within an inch of its life, but otherwise is perfect. We plan to paint it an antique white color to match the crib and hopefully rescue it from those who are distress-crazed. Now, don't get me wrong. I think some distressing is just fine. But this poor piece had begun to resemble a faded out Dalmatian. You can see from its elegant lines that this dresser (which may actually be a buffet) did not deserve this sort of unjust indignity.
So, with the discovery of the changing table/dresser, we have one more thing checked off the list. Along with painting this, we have two more items of furniture to paint the same antique white. You may have also noticed that the walls behind the crib are brown, like the walls in the rest of the house. We're planning to take a gutsy leap (for us) and paint Baby's room an ethereal blue with white clouds. We hope to begin all sorts of painting projects (for which I will mostly be supervising) soon.
We are so very excited to welcome this new little life and are praying for health. Many prayers are appreciated, and hopefully, we'll keep you updated as we go along!
I can't wait to get started on all the things I want to do before Baby comes! For those who care, and so I'll have it written down somewhere, here's the list of large projects I hope to complete:
- Find a crib
- Find a dresser to use as a changing table
- Paint furniture for Baby's room
- Paint Baby's room
- Make slipcover for rocking chair
- Engineer some way to filter light from the half-moon window in Baby's room
- Find curtains
- Clean out closets in both extra bedrooms to make room for Baby's stuff
- Have a Yard Sale with the items cleaned out of the closets
And that's just the short list... so far...
Of course, ideally, we'll get most of this done in the next couple of months so that by the time October rolls around and I'm hideously uncomfortable, I won't still be worried about all of this. We'll see.
Fortunately, thanks to some wonderful parents and in-laws of mine, we have two of the items already marked off the list. A few weeks ago, while I was slaving diligently into the night (ok, so it felt like night), my parents called me. They had discovered a crib that they thought I might like. I must assure you that I do like it! It is a crib, but converts to a toddler bed and then to a twin bed. It's just what I wanted.
My lovely parents brought it home for us, and helped us get it out of the box.
 |
| My dad and husband unpacking the box. |
 |
| Baby's bed! |
Isn't it precious!?
Meanwhile, I had decided that instead of a traditional changing table, I wanted to convert a dresser into a changing table. This would allow the furniture in Baby's room to grow with Baby.
After telling this to my in-laws, they jumped right on it. Searching in antique shops, thrift stores, and Craigslist, they sent me picture after picture of dressers they thought I might like. While I didn't end up choosing one that they found (though I almost did), their ideas helped me decide what I was looking for in a dresser. I decided that I was going for a look something like this:
 |
| Image via Pinterest |
Obviously, what I'm looking for is not exactly like this. For one thing, who puts shelves down so far on the wall where the baby could reach them while being changed? I'm not really sure about some people's style choices these days. Nonetheless, as far as the dresser/changing table situation goes, I really liked this style. I like that there's a pad for the changing, but enough room to the side to possibly put a basket of diapers, wipes, etc. I also like that there are drawers for storage, but also cabinets for some things that might not fit in drawers. The dresser is also generic and versatile enough to become just a dresser once Baby is grown and a changing table is no longer needed.
But you don't need to hear me go on and on forever about why I like it. All you need to know is that this is similar to what I was looking for. So, this past weekend, my husband and I made a forage into the depths of a flea market in search. Amazingly, we found it. It, also, is perfect.
 |
| Baby's changing table |
It's a strange gray color, and unfortunately, has been distressed to within an inch of its life, but otherwise is perfect. We plan to paint it an antique white color to match the crib and hopefully rescue it from those who are distress-crazed. Now, don't get me wrong. I think some distressing is just fine. But this poor piece had begun to resemble a faded out Dalmatian. You can see from its elegant lines that this dresser (which may actually be a buffet) did not deserve this sort of unjust indignity.
So, with the discovery of the changing table/dresser, we have one more thing checked off the list. Along with painting this, we have two more items of furniture to paint the same antique white. You may have also noticed that the walls behind the crib are brown, like the walls in the rest of the house. We're planning to take a gutsy leap (for us) and paint Baby's room an ethereal blue with white clouds. We hope to begin all sorts of painting projects (for which I will mostly be supervising) soon.
We are so very excited to welcome this new little life and are praying for health. Many prayers are appreciated, and hopefully, we'll keep you updated as we go along!
Tuesday, January 22, 2013
Shutter Speed
I'm a semi-procrastinator. I put off things until they bother me so much I just can't take it anymore, and then, I get whatever it is I've been procrastinating done in a very short, very exhausting amount of time.
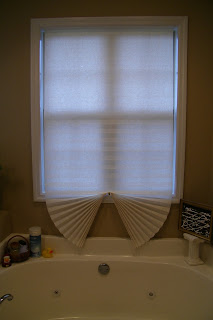
We moved into our house in December of 2011. In the master bathroom, the sellers had put up in the windows these paper shades that were stuck with heavy duty double-sided tape to the top of the window frame. They weren't the worst things I've ever seen... but they were by no means pretty.


Upon settling in, we immediately went about decorating, arranging furniture, and getting things the way we liked them. Yet, because, no one ever saw our master bathroom but us, we let it slide until we figured out what we wanted to do with them. I've always wanted a black and white bathroom. Black and white tile, white wainscoting on the bottom half of the wall, black paint on the top half, and black and white accessories. However, our house was freshly painted a tan color by the sellers, we didn't want to spend time painting before moving in, and I'm not entirely sure how to do wainscoting on these walls due to the weird wall ledge beside the tub. So, we left the bathroom tan.
Not long after we moved in, I realized it will be years, if not never, before I have the chance for a bathroom exactly like I'd envisioned. So, rather than waste time and money on a decor that was my second choice, I decided to incorporate the tan into the black and white theme. So, our bathroom is black and white and tan. Once I'd decided that, I picked out window treatments. At first, I was going to make Roman shades with the fabric from my Bathroom stool project. Then, I realized that for decency sake, I'd have to keep the shades all the way down most of the time, and I really wanted more sunlight than that. That's when I went to the Houston Library in Athens, AL. There in the bathroom were old fashioned shutters. I fell in love. That was the moment I decided I had to have shutters for my own bathroom.
 My husband and I took measurements and checked out prices at Lowes. Yeah, there was no way we could afford that route. We then turned to one of my favorite home decor solutions: Antique Stores. We visited Hartselle, AL, and scoured the shops for four shutters that fit our measurements. It was not easy, but we were successful. As the shutters had a natural finish, now all we had to do was paint them white and hang them. Then, the month turned to June. It was simply too hot to be outside painting. Trust me, I tried. I took my little brush and a can of paint and sat for hours while making very little ground painting each slat one by one. So, I set the project aside for cooler weather. Granted the ideal time would have been Fall, but I was just incredibly busy in the Fall with other projects, and didn't have the motivation. It wasn't until after Christmas, when I worked on my Candlestick project, that I became inspired.
 In my off time, I had decided that spray primer and paint was my best bet, as long as I was careful not to paint the shutters closed. So, armed with my trusty trigger tool and a can of primer, I went to work.
It was not a short project. I first sprayed all the shutters with primer. This was very important. The paint refused to stick without it... I tried. Then, I let it dry. I sprayed on another coat of primer. I let it dry. I sprayed on a coat of paint. I let it dry. I sprayed on several more coats of paint and let them dry. As I began to work on the last shutter, I ran out of the cheap Lowes paint I'd been using. You see, I didn't want this to be a million dollar project, so I bought the cheap stuff. I thought paint is paint and white is white (in the spray paint world at least). I had on hand some Rustoleum paint I'd used to paint my patio furniture. So, rather than go back to the store and buy more paint, I used it. I was shocked. One coat and it was covered. A few sprays of touch-up and it was done. Lesson learned, I thought to myself. If it looks like colored water, and it acts like colored water, it probably is very near to colored water. Don't buy the cheap stuff. You'll spend more money on more cans of it than you would on quality spray paint.
Despite my mistakes in paint choices, the shutters were FINALLY finished. Now, to hang them. I knew I got married for a reason. We bought shutter hinge kits at Lowes so we'd have matching hardware, and I commandeered my husband to help me for a Saturday project.
We relished the pulling down of the paper shades:

And after the shades were down, we found a couple of helpers:
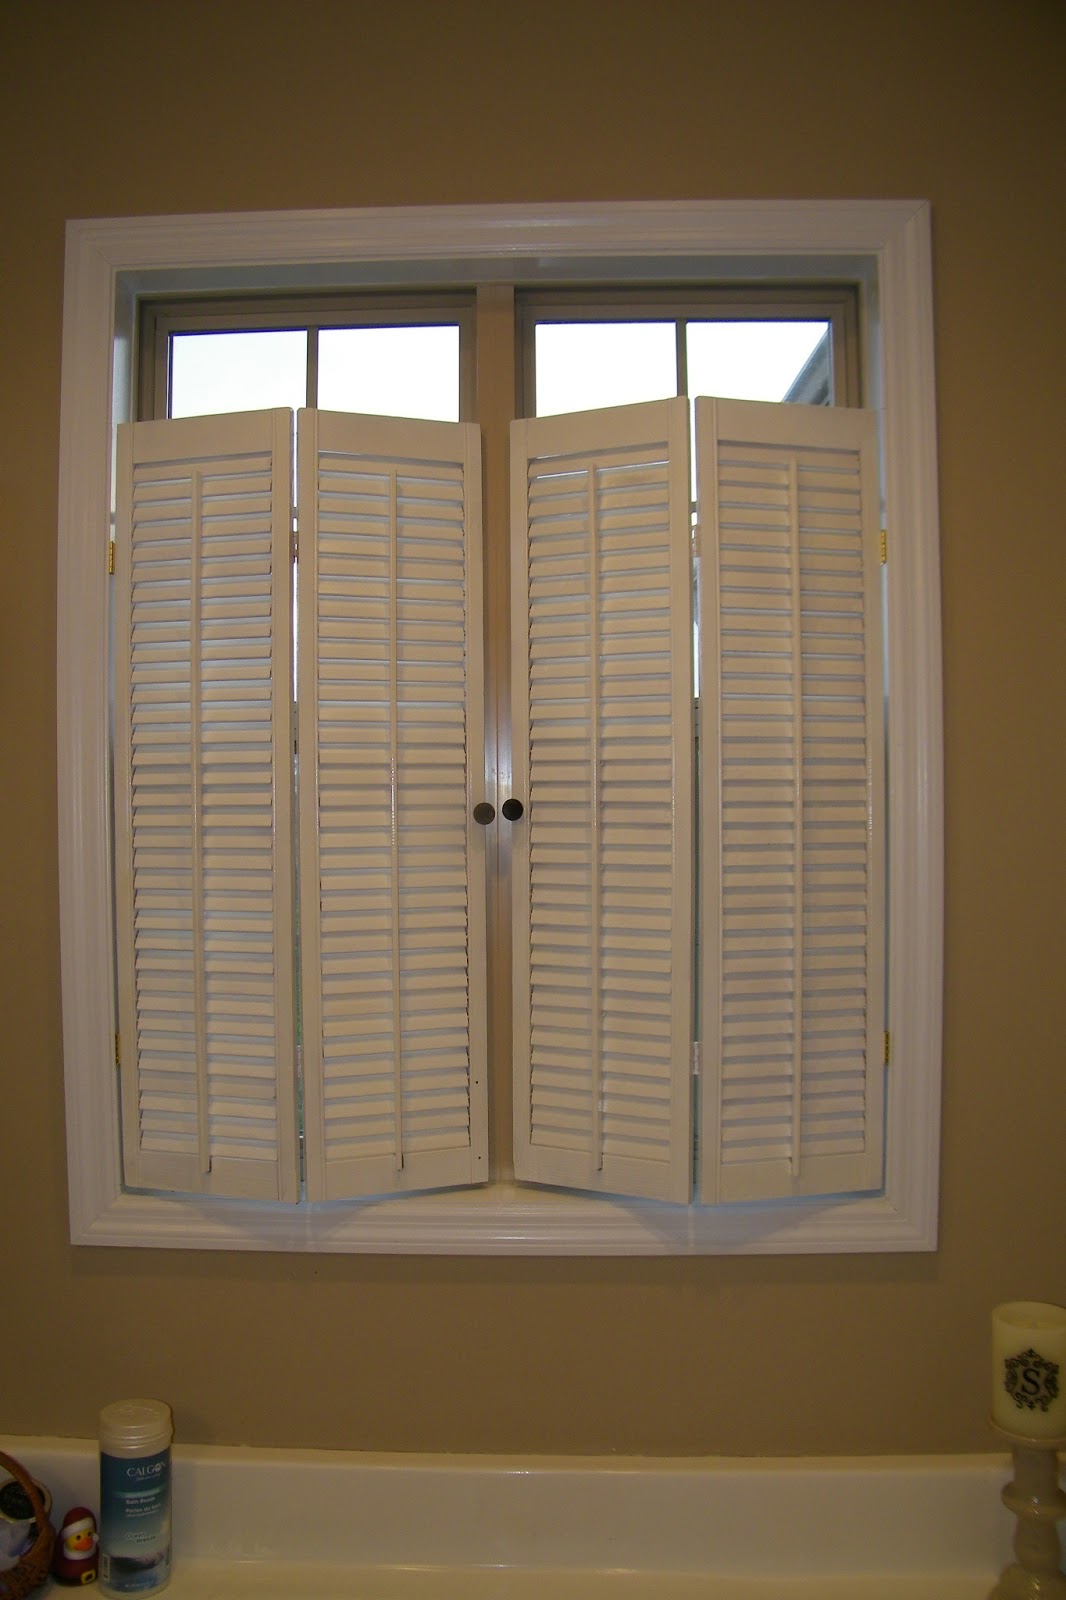
After much measuring and many escape attempts by the screws, we got our bathroom shutters up! I love them so much! I love how they provide privacy while letting in light through the slats and through the unfiltered window at the top.


Aren't they wonderful?! Just to prove it, here's a Before and After:
We moved into our house in December of 2011. In the master bathroom, the sellers had put up in the windows these paper shades that were stuck with heavy duty double-sided tape to the top of the window frame. They weren't the worst things I've ever seen... but they were by no means pretty.


Upon settling in, we immediately went about decorating, arranging furniture, and getting things the way we liked them. Yet, because, no one ever saw our master bathroom but us, we let it slide until we figured out what we wanted to do with them. I've always wanted a black and white bathroom. Black and white tile, white wainscoting on the bottom half of the wall, black paint on the top half, and black and white accessories. However, our house was freshly painted a tan color by the sellers, we didn't want to spend time painting before moving in, and I'm not entirely sure how to do wainscoting on these walls due to the weird wall ledge beside the tub. So, we left the bathroom tan.
Not long after we moved in, I realized it will be years, if not never, before I have the chance for a bathroom exactly like I'd envisioned. So, rather than waste time and money on a decor that was my second choice, I decided to incorporate the tan into the black and white theme. So, our bathroom is black and white and tan. Once I'd decided that, I picked out window treatments. At first, I was going to make Roman shades with the fabric from my Bathroom stool project. Then, I realized that for decency sake, I'd have to keep the shades all the way down most of the time, and I really wanted more sunlight than that. That's when I went to the Houston Library in Athens, AL. There in the bathroom were old fashioned shutters. I fell in love. That was the moment I decided I had to have shutters for my own bathroom.

 In my off time, I had decided that spray primer and paint was my best bet, as long as I was careful not to paint the shutters closed. So, armed with my trusty trigger tool and a can of primer, I went to work.
It was not a short project. I first sprayed all the shutters with primer. This was very important. The paint refused to stick without it... I tried. Then, I let it dry. I sprayed on another coat of primer. I let it dry. I sprayed on a coat of paint. I let it dry. I sprayed on several more coats of paint and let them dry. As I began to work on the last shutter, I ran out of the cheap Lowes paint I'd been using. You see, I didn't want this to be a million dollar project, so I bought the cheap stuff. I thought paint is paint and white is white (in the spray paint world at least). I had on hand some Rustoleum paint I'd used to paint my patio furniture. So, rather than go back to the store and buy more paint, I used it. I was shocked. One coat and it was covered. A few sprays of touch-up and it was done. Lesson learned, I thought to myself. If it looks like colored water, and it acts like colored water, it probably is very near to colored water. Don't buy the cheap stuff. You'll spend more money on more cans of it than you would on quality spray paint.
Despite my mistakes in paint choices, the shutters were FINALLY finished. Now, to hang them. I knew I got married for a reason. We bought shutter hinge kits at Lowes so we'd have matching hardware, and I commandeered my husband to help me for a Saturday project.
We relished the pulling down of the paper shades:

And after the shades were down, we found a couple of helpers:
 |
| ^Zeus and Apollo^ |
After much measuring and many escape attempts by the screws, we got our bathroom shutters up! I love them so much! I love how they provide privacy while letting in light through the slats and through the unfiltered window at the top.


 | ||
| Damask Stool, Black Candlesticks, and Shutters! |
|
| BEFORE |
 |
| AFTER |
Friday, January 11, 2013
All I Want for Christmas are Some Ugly Candlesticks...
(Sing the title. It works!... Annnddd now it's stuck in my head...)
Happy New Year! It is now 2013, and a brand new year for brand new things... or for making old things new.
You'll never guess what I got for Christmas. Yes, that's right. My in-laws gave me some of the ugliest candlesticks I've ever seen. I can hear you now, "That's not very nice to say on the internet... or ever." But it's ok. Really. I asked for them.
You see, for awhile now, I've been wanting some chunky candlesticks to decorate our soon-to-be black and white-ish bathroom. I just haven't been willing to shell out the money for some lovely, designer label versions. I had been meaning, instead, to go to thrift stores and such to see if I could find some that I hated enough to paint, but loved enough to buy. I just hadn't found the time. So, when my in-laws asked what I wanted for Christmas, I remembered their own love for thrift shop finds and a light bulb clicked on over my head. I ASKED them for chunky candlesticks, with cool shapes, and made sure to tell them that I didn't care how they were painted because I intended to paint over them. Boy, did they come through. (And threw in chunky candles to go with the candlesticks, which made it even better.)
 See how ugly they are? No offense intended to any of you who might have some exactly like these.
Here they are individually:


That last one isn't so bad, but the other two are. In any case, it doesn't matter how ugly they are or aren't: they all have great shapes. So, I spent part of my time off after Christmas turning these from drab to fab. I used Rustoleum Gloss Black spray paint with the little trigger, which makes things so much easier, but is a little more expensive.

Believe it or not, this all took longer than I thought it would. Somehow, whatever the candlesticks are made of did not like spray paint very well. I had a large problem with the paint just running off, and it wasn't mostly on the one I thought it would be (the tall stone candlestick). However, I just kept at it. I sprayed several coats, until finally it was all covered and dry.
Meanwhile, I worked on some other darlings I found at an antique shop shortly after Christmas.


I really like the gold ones. I love all the detail in their pattern. I decided that I wanted all of these to be silver, however. So... using Krylon Silver Foil Metallic spray paint, I made it so.

This can of paint did not have the handy-dandy easy-on-your-poor-fingers trigger. But I'm going to tell you a secret. Or, if you already know, then I'm going to tell you something utterly mundane that I should have discovered a long time ago. It's this:

This is a tool made by Rustoleum that fits over the normal nozzled cans of paint and makes them into a trigger can. Honestly, over the last few days, this baby has saved my life. I wouldn't have fingers left if it weren't for this guy. Amazing product! I wish someone had told me it existed. Now, I don't have to spend the extra amount for the cans with the trigger built in. This gadget was around $7 at Lowes. Go get one, or two, like I did.
Ok, back to our regularly scheduled programing:
I sprayed the antique shop candlesticks silver. They took considerably less time than the Christmas ones did. I love how they turned out.


Now, back to the ugly Christmas candlesticks.
When they FINALLY dried, I placed them in their natural habitat, holding their own white candles.


Not so ugly now, are they? They make me smile. The mixture of shapes is what really does it for me. I'm so excited! And really thankful for in-laws that know me so well. Not only did they give me the gift of beautifully ugly candlesticks, but they gave me the gift of a project I can be proud of.
Inspired, yet?
I was. After finishing this project, and wanting desperately to use my trigger tool more. I resolved to tackle our bathroom window-dressing issue. You see in those last two pictures the temporary paper sticky blinds in our bathroom? Yes, I know they are ugly. And yes, they have been up for over a year now. I know. I'm terrible. But just wait... I'm working on it. For real, this time.
Happy Painting!
Happy New Year! It is now 2013, and a brand new year for brand new things... or for making old things new.
You'll never guess what I got for Christmas. Yes, that's right. My in-laws gave me some of the ugliest candlesticks I've ever seen. I can hear you now, "That's not very nice to say on the internet... or ever." But it's ok. Really. I asked for them.
You see, for awhile now, I've been wanting some chunky candlesticks to decorate our soon-to-be black and white-ish bathroom. I just haven't been willing to shell out the money for some lovely, designer label versions. I had been meaning, instead, to go to thrift stores and such to see if I could find some that I hated enough to paint, but loved enough to buy. I just hadn't found the time. So, when my in-laws asked what I wanted for Christmas, I remembered their own love for thrift shop finds and a light bulb clicked on over my head. I ASKED them for chunky candlesticks, with cool shapes, and made sure to tell them that I didn't care how they were painted because I intended to paint over them. Boy, did they come through. (And threw in chunky candles to go with the candlesticks, which made it even better.)

Here they are individually:


That last one isn't so bad, but the other two are. In any case, it doesn't matter how ugly they are or aren't: they all have great shapes. So, I spent part of my time off after Christmas turning these from drab to fab. I used Rustoleum Gloss Black spray paint with the little trigger, which makes things so much easier, but is a little more expensive.

Believe it or not, this all took longer than I thought it would. Somehow, whatever the candlesticks are made of did not like spray paint very well. I had a large problem with the paint just running off, and it wasn't mostly on the one I thought it would be (the tall stone candlestick). However, I just kept at it. I sprayed several coats, until finally it was all covered and dry.
Meanwhile, I worked on some other darlings I found at an antique shop shortly after Christmas.


I really like the gold ones. I love all the detail in their pattern. I decided that I wanted all of these to be silver, however. So... using Krylon Silver Foil Metallic spray paint, I made it so.

This can of paint did not have the handy-dandy easy-on-your-poor-fingers trigger. But I'm going to tell you a secret. Or, if you already know, then I'm going to tell you something utterly mundane that I should have discovered a long time ago. It's this:

This is a tool made by Rustoleum that fits over the normal nozzled cans of paint and makes them into a trigger can. Honestly, over the last few days, this baby has saved my life. I wouldn't have fingers left if it weren't for this guy. Amazing product! I wish someone had told me it existed. Now, I don't have to spend the extra amount for the cans with the trigger built in. This gadget was around $7 at Lowes. Go get one, or two, like I did.
Ok, back to our regularly scheduled programing:
I sprayed the antique shop candlesticks silver. They took considerably less time than the Christmas ones did. I love how they turned out.


 | |
| Look at the detail... and how these can hold both chunky and tapered candles! |
Now, back to the ugly Christmas candlesticks.
When they FINALLY dried, I placed them in their natural habitat, holding their own white candles.


Not so ugly now, are they? They make me smile. The mixture of shapes is what really does it for me. I'm so excited! And really thankful for in-laws that know me so well. Not only did they give me the gift of beautifully ugly candlesticks, but they gave me the gift of a project I can be proud of.
Inspired, yet?
I was. After finishing this project, and wanting desperately to use my trigger tool more. I resolved to tackle our bathroom window-dressing issue. You see in those last two pictures the temporary paper sticky blinds in our bathroom? Yes, I know they are ugly. And yes, they have been up for over a year now. I know. I'm terrible. But just wait... I'm working on it. For real, this time.
Happy Painting!
Subscribe to:
Comments (Atom)